adding make up to a face
1. open up the photo in photoshop.
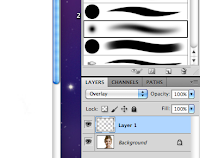
2.start a new layer. in the panel on the right, at the bottom right corner next to the trash can, there is an icon that looks like a page being turned. select that and it will create a new layer.
3. choose the brush tool from the panel on the left. then select the icon for the foreground color and a new window will open. from here you will choose the color you would like to use.
4. open the options for your brush. choose a soft brush, set the hardness to 0%, set the opacity to 100% and make sure mode is set to normal. the size of the brush will vary depending on the photo or what your are applying color to.
5. zoom in to the area where you will be applying the color. start applying!
6. select the eraser tool. set the opacity to 10% and leave the hardness at 0%. use the eraser around the edges of the color. this will make them smoother.
7. change the blending to overlay. you can also choose the blur tool to smooth the edges of the color even further if you think it's necessary.

8. select image, adjustments, hue/saturation. when the windows opens, lower the saturation and the lightness.
9. turn down the opacity till you are satisfied with how it looks.
10. when you are finished editing your photo, go to Layer, then Flatten Image.
11. Tada.


No comments:
Post a Comment