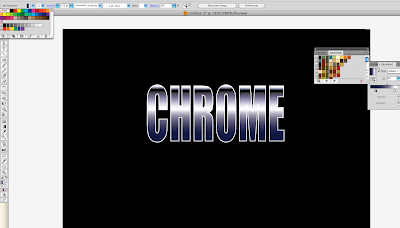
This tutorial is going to show how to produce chrome text easily using illustrator.
Step 1: Select the font you want to use. I chose to go with impact because it is very clean and easy to read.
Step 2: Go to Type > Create Outlines to convert your letters into solid shapes.
Step 3: Now you're going to want to give your text a gradient so that you will start to get a nice metallic look to your font. When you add the gradient it will be vertical, so you will have to change the angle so it is going horizontally over the font.
Step 4: Now you will change the colors of your gradient. I went for blacks, whites, and dark blues on my letters. You can also add as many color swatches as you desire to your font, for more variety in the chrome effect.
Step 5: Select the text and head to Object > Path > Offset Path. In the options box enter an offset of -0.75mm, then right click on the text to ungroup it.
Step 6: After setting my color swatches the white on the font blends into the background, so I used the rectangle tool, selected the entire image size, made the fill black, and then arranged the rectangle, sending it to the back so that the font would be uncovered.
Step 7: Now my font blends with the black background in places, but I want to keep the black, so I add a .75 pt stroke in white so that the word pops from the background.


No comments:
Post a Comment