1.First start with a photo, I selected one at random and made the background black. Apparently my sshot of the black screen didn't come out. But you can go to the paint bucket and color the background black. Don't forget to make a duplicate layer of your base and to save often.
 |
| Butterfly without background. From here you can add background color of choice and resize the image if you wish. |
2.Now you can create the extra effects.
Now go to the Pen tab.

3. Create curves. This might take a little practive. One click places the start; where you want the curve to begin. The second click places the other end but before taking off with more clicks pull on the end to create the rounded line. I created a curve with three dots to give it more interest.

4.Now you need to go to the paintbrush icon and select your size of brush, I chose relatively small 8-9 pixels then later created a bigger one. Play around with the sizes and see what you like.

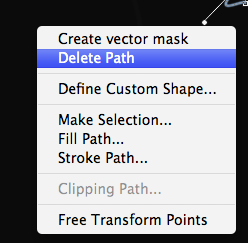
5.Now you need to select the pen again and right click. Choose to stroke the path.

6.Choose to stroke the path with a brush and select the simulate pressure button. This means there will be tapering on both ends like the streak actually starts and ends.

7.Once you press ok it will stroke your path with whatever color you have selected. I chose light blue to match the butterfly. Then right click and select to delete the path. This will leave the stroke of color but delete the graph that helped create it.

8.Right click on the layer and chose style this will open a pop up window with lots of options.
You can also click layer tab on top select style and a drop down bar will give you this options.

9.Select outer glow with a bright color, I chose another bright blue from the butterfly. Then go to Drop Shadow (shown below) set distance on 0, select Color Dodge for the blend mode and select a medium color from your image.

10.Now if you go to your layer box in the bottom right hand corner, right click on the layer we've been working on and copy layer style. Now you can create as many swirls as you want without repeating the layer style adjustments. Simply repeat steps 3, 5, 6 and 7 in a new layer, right click on the layer and paste layer style. Now every swirl you make will match the first, I went a little crazy but I was learning and having fun. If you want some thicker ones just repeat step number 4 and pick a larger pixel size.

No comments:
Post a Comment