Wednesday, February 29, 2012

Tuesday, February 28, 2012
Offering D2 Students Some Inspiration
There's going to be a new organic grocery store opening soon in Edmond, OK. Check it out! You might get inspired to put some of this food in your own flyers.
http://www.uptowngroceryco.com/
http://www.uptowngroceryco.com/
d1 tutorial MUST SEE TV
http://www.youtube.com/watch?v=2hH3UbD14S8&feature=youtu.be
you can copy paste this into the browser bar
Monday, February 27, 2012
Sunday, February 26, 2012

Saturday, February 25, 2012


Friday, February 24, 2012


Thursday, February 23, 2012


D2 ink'd and 10 sec logo- j clark


one thing i tried to keep in mind is the fact that you said that we should try our best to try to keep images out of the logos so i tried to make my logos based off of that aspect.


D2 B Smooth logo BA


D2 Brandon's Logos Hale


In the first one, I have my INKD logo bigger, and in the second I add in different colors.
In my first Racing logo, it seemed really simple so I changed the letters to look somewhat like a car, but couldn't quite figure out how to make it look right.


explanation for upcoming D2 logos
"Ten Second Racing" is a top of the line manufacture of high quality aftermarket automotive racing parts. They have been in the business for 60 years now and think it is time for a change. They are looking for a typographic logo that will look modern in the automotive world. This logo needs to be modern yet sophisticated enough to give it a timeless look. They are on top and need to look the part. Choice in colors and number of colors is up to you.
The name "Ten Second Racing" can be subject to change such as "10 Second Racing" or "10 Sec Racing"
"Ink'd Studios" is new in town and needs a creative and eye catching logo for their new business. They pride themselves on clean work and a clean work place so they need a design that obviously represents that it's a tattoo shop, but does NOT look grungy, low grade or cheap. They are open to any color scheme.
Brandon Arnold
Wednesday, February 22, 2012

Tuesday, February 21, 2012

D2 tutorial #2- Amie
I know it's late, but here is my tutorial anyways

Create 4 vertical lines using the Rectangle tool. Make the
first one and then copy and paste to make the others. Choose your colors for your Palette. You can
find color palettes here Kuler
. Next add a linear gradient effect to each line.

Select all lines and go to Object>Envelope Distort and
choose Make with Mesh. Use the preview to see the mesh before you click Ok.
Choose for 4 columns (1 for each line) and 2 rows (to have only 1 handle
vertically in the center).

Tweak the lines mesh by dragging on the handles.

Now you will duplicate the layer with the lines mesh on top
of the original mesh. Click the layer target circle icon on the right in the
layers palette and then change the mode to Overlay. Move the shape around a little
to make it more interesting.

You can also tweak it with the Warp, Pucker and Bloat or other transformation tools. I just copied the design and rotated it. This could be used in all types of designs.
D1~ Erica~ Tutorial 2, Creating a Vignette for a Photo using Curves
First of all, a Vignette is a way to bring attention to an object in a photo by making other parts darker.


Here comes the Gradient part, it is also the paintbrush tool so you may have to right click to view the gradient tool

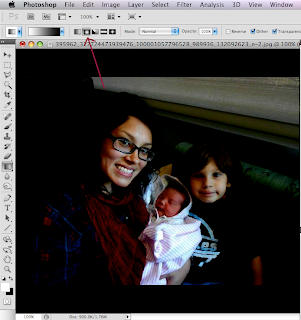


Open a photo and duplicate layer~ go down to the circle with a half blue and white (new adjustment layer) and select curves
This opens the Curves adjustment layer
Next you will adjust the dark
dot over quite a bit

and also bring the one in the middle down

Here comes the Gradient part, it is also the paintbrush tool so you may have to right click to view the gradient tool

At the top select the foreground to background color and press Shift D for default colors which are black and white. Press Shift X to get the black as foreground color.
Now press the circle gradient button

Click once in the middle of the photo and drag out to the edge of photo
The closer or further you extend this will determine how much is to be darkened.

further distance

smaller distance

Before it was adjusted
Subscribe to:
Posts (Atom)