Thursday, April 28, 2011
D1 Passage of Time- Hopkins
My passage of time was over the life and death of a radish. I used 5 fps. It would have been more effective if I would have used a tri-pod because the frames kind of jump around.
Shout out to Austin and Portel for their help :)
D1 Time Lapse/Passage of time - Boydstun
This is my time lapse for the Passage of Time assignment to make up for the Way-too-shortness of my stop motion video.
I set a camera up in the front of my car on the dash board to record the lightning.... sorry the first half is pretty boring...
I set a camera up in the front of my car on the dash board to record the lightning.... sorry the first half is pretty boring...
D1 Stop Motion/Passage of time - Boydstun
It's way too short I know... I made a Time Lapse video to make up for the way-too-shortness.
I'm working on uploading my it right now...
Well..
I'm having issues.
Apparently my movie is to big. I uploaded it to YouTube and it is only playing like the top-left corner of the movie.
help?
D1 Stop Motion Turner
http://www.youtube.com/watch?v=olxByHPMGrM
For some reason a white box keeps appearing but I will repost later at higher quality
D1 time lapse # Sijan
For my assignment on time lapse, I drove around the city of Ada and choose the best pictures to make the video. Or choose the best timing since i could not use all the pictures to make the video since they were too large. I found the track on , youtube which was titled " ink the complete soundtrack : tick tock " and then converted the youtube video to mp3 from the free website found via google. Since, i used iMovie to make the video i used a little more features available on the iMovie, the title name and the globe in the beginning .
D1. Portel Bellamy - TImelapse
D1. Portel Bellamy - Time lapse
Here is my time lapse. I call it (super awesome easter roller coaster) Surprise. I just got a K'new roller coaster kit and made it for my nephew and nieces and took numerous photos during the process. I took about 270 images at a 5 fps rate. I got the song form a website called incompetech.com because it had copy-right free music (just in case Youtube took the song off). The song is called Ropocalyse 2 just in cause you want it. And yeah, I know the song is ridiculous, but I thought it was funny, so it stayed. Anyways, if you have any questions just let me know and I hope you enjoy it. Thanks.
D1 Still trying #4 Passage of Time Filipelli
This is my greenery in my backyard over the last few weeks. The birds kept getting my strawberries. Pamela
D1-J.Clark Passage of Time (just in case)
Got on this mornin an had one comment n then it wouldnt let me view the video so i put this one up just to be safe...
D1 3rd attempt Passage of Time Filipelli
Well, let's see if this doesn't make you sick. It's a bunch of pix of walking through my empty new house.
D1 Passage of Time (Stop Motion) Hale
http://www.youtube.com/watch?v=TBogd3NyjKY
I am going to try to upload a higher quality version in class, I just wanted to make sure I got a copy in on time
I am going to try to upload a higher quality version in class, I just wanted to make sure I got a copy in on time
Wednesday, April 27, 2011
Second attempt D1 Passage of Time Filipelli
Okay, here goes . . . OMG, I just previewed it. I'm motion sick. It gives a 360 degree effect.
I took a series of pictures of my workspace from three different points in the room over the whole semester. This is the compilation of those pictures. If it was not so frustrating to try to get this stuff posted, I would try to post pix from just one point. With the software quitting mid-operation and all the different stuff happening to the computers in the lab, I just am getting very tired of this project. :( Pamela
D1 McDaniel Passage of Time
I had the same problem as Austin, after converting to quiktime it cut out the first few frames and it threw the timing off a little with the music.

HELP!!
been in the lab forever it seems tryin to upload this video but flash keeps on shutting down!!! does anyone know what to do...
Tuesday, April 26, 2011
D1 Passage of Time- Dozier
Something I think we can all appreciate...
Unfortunately the banana was not rotting very quickly for me, which is strange because usually I can't keep them fresh when I buy them... Anyways, the fruit flies I collected during the shooting of this need to leave my room now! haha
D1 Hamm- Passage of time/ Stop motion
Here is my passage of time/ Stop motion project. Sorry that it is really choppy, it was already choppy just because it was a stop motion, but once I uploaded to YouTube it got worse and actually left out some frames for some reason.
D1 Passage of Time-first try Filipelli
TECHNICAL DIFFICULTIES
It is suppose to run my pix of my workspace all semester long.
Thursday, April 21, 2011
D1Tutorial 5 Robinson

 How to make your own Recycle Symbol for Earth Day.
Find photos to use for your recycling image.


use the quick select tool or magic wand to select each part of the recycle symbol. Select the background image in this shape and copy and paste into new layer. Flatten this image.


After you get all three pieces where you want them add a gradient and adjust the settings to get the look you want. Add color. Next add a drop shadow and soft edge from the effects menu to make it look more 3D. Burn and dodge the edges where the highlights and shadows appear. You could add some spotlights or other lighting effects.

You can change the colors in the gradient mask.

Finished image

dig1tut5brenna
How to make your photo look like a sin city cartoon.

Find a picture and desaturate adjust levels. 58 1.00 73 you can also use the cut out filter and set to 2-3-2. The rain is kind of tricky as you can see from my example.

D1 Tutorial #5 Sijan
Photo Stylizing Effect by Fragments
1. Open a picture and change its size to 600 x n750 pixels.

2. open a new document , size 55 x 55 and draw a pattern with pencil tool 1 px, you can only draw a black and a white dot.

3. Save the document as a pattern by edit>define pattern. After that open the main document and fill it with paint bucket tool using our new created pattern. With the pattern selected change the layer to overlay with opacity of 80%.
]

4. After that go back to our background layer. All the actions we will be making with it only. Get out the Rectangular Marquee Tool to create selection like on my screenshot below. Hold Shift button to get proportional to the square selection.

5. Once you have the rectangular area selected with the rectangular marquee tool, apply gaussian blur to the area. Filter > Blur > Gaussian blur.

6. Repeat the same blur step to apply to other areas. You can hit Ctrl + D, once you are done with the blur.

7. Right click on the layer, go to blending options and apply drop shadow and out glow to the image.


8. The final image :

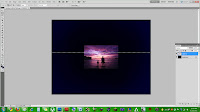
D1 Tutorial #5 Jami Turner
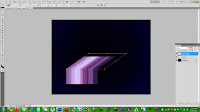
 My tutorial is taking photographs, and transforming them into vanishing cubes in space.
Step 1: Make a background. I just filled the space with dark blue, then used a soft low opacity brush to add black to make more depth.
 Step 2: Take a brightly colored photo, or one with lots of different colors. After you choose a pic, you're going to use the single row marquee tool to choose one line of pixels on the photo that you want to use. Copy the row of pixels, then paste them in a new layer. After this, delete the original photograph so that you are left with the thin line of pixels.
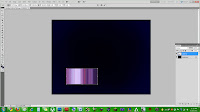 Step 3: Use free transform to make the line of pixels stretch in to thin stripes of color. You can make the block of lines any size you like.
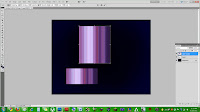 Step 4: Make a duplicate layer of the block of stripes, and free transform the duplicate layer to make the second block taller than the original. They should remain the same width.
 Step 5: Move the 2nd layer of stripes so that it lines up perfectly and connects to the original stripes.
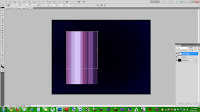
 Step 6: After connecting them, while still using free transform, hold down the Ctrl button, and pull on the top middle dot to the right. This will stretch the stripes to create dimension without separating the top stripes from the bottom ones.
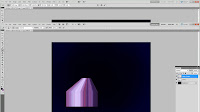 Step 7: Next, while still using free transform, hold down Ctrl-Alt-Shift, and pull on the top left dot to the right. This will make both of the top outside dots come closer to one another, giving the illusion of a cube being sucked into space.
 Step 8: After this, add some shadows using a soft low opacity brush.
 Step 9: Repeat! Choose photos that have lots of varying colors.
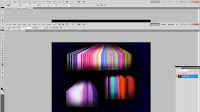 Step 10: Using the dodge tool, I made the cubes' surfaces look a little brighter because I didn't like the colors looking dull and dark.
 Finished!
 Step 2: Take a brightly colored photo, or one with lots of different colors. After you choose a pic, you're going to use the single row marquee tool to choose one line of pixels on the photo that you want to use. Copy the row of pixels, then paste them in a new layer. After this, delete the original photograph so that you are left with the thin line of pixels.
 Step 3: Use free transform to make the line of pixels stretch in to thin stripes of color. You can make the block of lines any size you like.
 Step 4: Make a duplicate layer of the block of stripes, and free transform the duplicate layer to make the second block taller than the original. They should remain the same width.
 Step 5: Move the 2nd layer of stripes so that it lines up perfectly and connects to the original stripes.
 Step 6: After connecting them, while still using free transform, hold down the Ctrl button, and pull on the top middle dot to the right. This will stretch the stripes to create dimension without separating the top stripes from the bottom ones.
 Step 7: Next, while still using free transform, hold down Ctrl-Alt-Shift, and pull on the top left dot to the right. This will make both of the top outside dots come closer to one another, giving the illusion of a cube being sucked into space.
 Step 8: After this, add some shadows using a soft low opacity brush.
 Step 9: Repeat! Choose photos that have lots of varying colors.
 Step 10: Using the dodge tool, I made the cubes' surfaces look a little brighter because I didn't like the colors looking dull and dark.
 Finished!
D1 Tutorial #5: Chesser
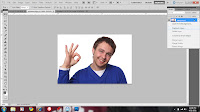
How to create an outlineor clip art look of an image or picture


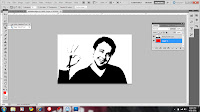


Step 4- After adjusting the threshold you will select the Magicwand Tool and then Select the backgroung. After selecting all of the background(Shift to select more than one area) you can click delete or edit-cut.


Finished!


Step 1- choose your image and make a duplicate of the layer. move the background to the trash.


Step 2- Next you will go Image and find Threshold.


Step 3-Adjust the threshold to what looks good.


Step 4- After adjusting the threshold you will select the Magicwand Tool and then Select the backgroung. After selecting all of the background(Shift to select more than one area) you can click delete or edit-cut.


Step 5- Next you can play with the filters and adjustments..I found that adding a drop shadow works well. Also by creating a new layer(s) you can add aditional images to the background and play with the filters and styles. This effect can also be created by going to filters and finding the stamp filter.

Finished!
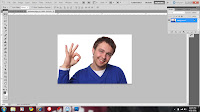
D2 Tutorial Miller

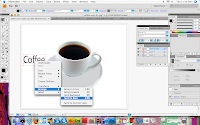
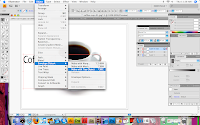
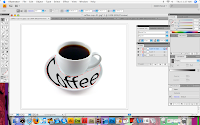
How to use Envelope Distort to wrap text onto an object.
First find an image you want to use.
 Then create a second layer using the layer box. Make sure that the new layer is selected and use the pen tool to create a shape in the area you want to put the text.
 Next click on the options menu in the layer box and duplicate the layer you just created.
 Then click on the new copied layer and use the text tool and type what you want it to say.
Make sure your text is selected and right click and send the text to the back.
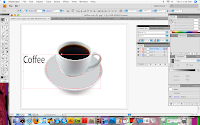
In the layers box click on the copied layer so that both the text and the shape of the plate are selected.
Go to the objects menu at the top of the window and go to envelope distort and make with the top object.
It will create the text to become warp like the shape you created. Then you will want to delete the second layer that was created that way your text wont have anything behind it but the plate. And thats it!
Subscribe to:
Posts (Atom)