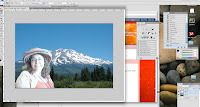
 In this tutorial, I will show how to take my sis out of a snapshot in a cafe and put her in nature.
 First, I selected her with the magic wand and cut & pasted her into a new layer. Then, I copied the background.
 Next, I went to the Filter pull-down menu and chose Blur, Surface to smooth out her look.
 You don't have to blur the image very much to get a nice touch.

 I played around with the adjustments some.


 Changed the brightness and contrast of the layer that just had her image in it.
 Went back to copy just her shape. Turned off the backgrounds.

 Pasted her onto a stock photo of Mt Shasta and then onto someone's vacation shot on the Internet of Bear Lake. I think she would appreciate all that travel!

 In the end, I changed the Image Adjustments a bit more to make her look like she belonged at Bear Lake. I liked the over-exposed look at Mt Shasta and left it like that.
1 comment:
Always try to choose photos that have the same light source when superimposing one onto another. A person / object photographed inside will never look 100% believable when placed on to an outdoor scene. Light direction and temperature all play a role.
Post a Comment