 My tutorial is taking photographs, and transforming them into vanishing cubes in space.
Step 1: Make a background. I just filled the space with dark blue, then used a soft low opacity brush to add black to make more depth.
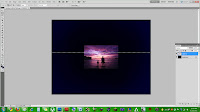 Step 2: Take a brightly colored photo, or one with lots of different colors. After you choose a pic, you're going to use the single row marquee tool to choose one line of pixels on the photo that you want to use. Copy the row of pixels, then paste them in a new layer. After this, delete the original photograph so that you are left with the thin line of pixels.
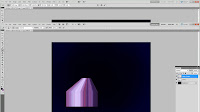
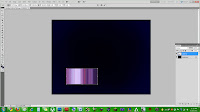 Step 3: Use free transform to make the line of pixels stretch in to thin stripes of color. You can make the block of lines any size you like.
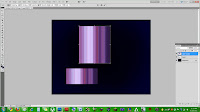 Step 4: Make a duplicate layer of the block of stripes, and free transform the duplicate layer to make the second block taller than the original. They should remain the same width.
 Step 5: Move the 2nd layer of stripes so that it lines up perfectly and connects to the original stripes.
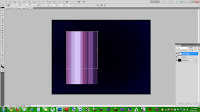
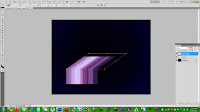 Step 6: After connecting them, while still using free transform, hold down the Ctrl button, and pull on the top middle dot to the right. This will stretch the stripes to create dimension without separating the top stripes from the bottom ones.
 Step 7: Next, while still using free transform, hold down Ctrl-Alt-Shift, and pull on the top left dot to the right. This will make both of the top outside dots come closer to one another, giving the illusion of a cube being sucked into space.
 Step 8: After this, add some shadows using a soft low opacity brush.
 Step 9: Repeat! Choose photos that have lots of varying colors.
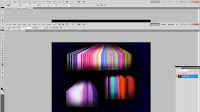 Step 10: Using the dodge tool, I made the cubes' surfaces look a little brighter because I didn't like the colors looking dull and dark.
 Finished!
 Step 2: Take a brightly colored photo, or one with lots of different colors. After you choose a pic, you're going to use the single row marquee tool to choose one line of pixels on the photo that you want to use. Copy the row of pixels, then paste them in a new layer. After this, delete the original photograph so that you are left with the thin line of pixels.
 Step 3: Use free transform to make the line of pixels stretch in to thin stripes of color. You can make the block of lines any size you like.
 Step 4: Make a duplicate layer of the block of stripes, and free transform the duplicate layer to make the second block taller than the original. They should remain the same width.
 Step 5: Move the 2nd layer of stripes so that it lines up perfectly and connects to the original stripes.
 Step 6: After connecting them, while still using free transform, hold down the Ctrl button, and pull on the top middle dot to the right. This will stretch the stripes to create dimension without separating the top stripes from the bottom ones.
 Step 7: Next, while still using free transform, hold down Ctrl-Alt-Shift, and pull on the top left dot to the right. This will make both of the top outside dots come closer to one another, giving the illusion of a cube being sucked into space.
 Step 8: After this, add some shadows using a soft low opacity brush.
 Step 9: Repeat! Choose photos that have lots of varying colors.
 Step 10: Using the dodge tool, I made the cubes' surfaces look a little brighter because I didn't like the colors looking dull and dark.
 Finished!
No comments:
Post a Comment