1) Type out whatever word you want to make 3D. Use whatever text and size you want. I used my name at 125 pt Trajan Pro.

2) Rasterize the image by going to Layer>Rasterize>Text

3) Go Edit>Transform> Perspective to change the perspective of the text.

Click on the upper left corner and pull the box upward to get this

4) Now hold down the ALT key on your keyboard and push the right arrow key about 15 times, depending on how deep you want the 3d effect to be. All this is doing is duplicating the layer. I did it 18 times in this example.
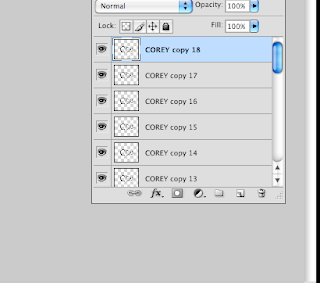
5) Now select the second layer down (in my case copy 17), then hold shift and click the original layer of text. This will select all of the layers of text except for the top one.

6) Go to Layer>Merge Layers

7) Double click on the now merged layers in the layers tab to bring up the panel. Select color gradient.

8) Click on the gradient to change the color.
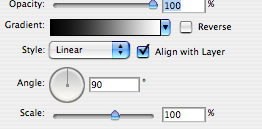

Select a sort of dark grey, or any color that you prefer. Then click OK.

9) Double click the top layer of text in the layer palette to bring up its editing panel.

10) Click color Overlay and select the color that you want your text to be. I chose a dark blue color

11) Click on Bevel and Emboss. Select Outer Bevel, Smooth, depth around 300, size about 2, softness about 3. You can use whatever settings you like, these just fit my preference for now. then click OK.


You can then mess with shadows or whatever you like to make it more 3D-ish or whatever you like.

2 comments:
very cool! This is something everyone can use at some point down the line
very helpful
Post a Comment