Monday, January 31, 2011
D2 Enclosure Brandon A
 Introducing Mist "body wash" ! For Men, Women and... anyone in between. Targeting mostly the younger crowd or just anyone who want to get that "OH MY DAMN" long lasting sexy smell!


D2 Enclosure #3 Gaither


These are my mist soap logos. The original logo that i created each of the covers of soap is at the top left side. I changed the color and the ellipses around the word mist in every soap. I was trying to keep the cover simple as well as to read clean as in soap. I put more image in the tropical sunrise soap cover because i thought it read better this way, while i fell the other cover project there intending purpose with out the extra imagery.
Winter Weather
There has been no decision made yet about class tomorrow. If it IS canceled I will post the news here (no later than 7:00 a.m.).

the Flu
2 art students that use the lab have confirmed cases of Type A Influenza. Please protect yourself and your classmates by using the hand sanitizer as often as you can.
If you feel like you are getting sick please go see the nurse.
If you feel like you are getting sick please go see the nurse.
D2 Homework #2 Pina
#8 Little Ben's Pizza

#7 Ballard's Drive-In
#6 Royal Twin Theater
#5 Action Figure Museum
#4 Green's Furniture
#3 El Pueblo Mexican Restaurant
#2 Mimi's
#1 Pauls Valley National Bank
D2 Enclosure #3 Pina


These are my designs for the Mist Deodorant Soap. The first one is the universal logo that I changed slightly depending on the variety of the soap. The Organic one seems a bit girly because of the color but I wanted to make it stand out from the green and that seemed to work well. The Tropical Breeze one is my least favorite, I think the color is a little harsh compared to the other varieties but other than that I like it. The Micro Clean one has a gradient on the bubble enclosure to represent a shiny texture like you see in toothpaste to represent cleanliness. I like the Aloe one because it's simple, which is why the Icy Blast one is one of my favorites as well.
Please read the post titles
February 8th
Next Tuesday morning D2 is cancelled because of Interscholastic
Next Tuesday afternoon it's business as usual for D1
Next Tuesday morning D2 is cancelled because of Interscholastic
Next Tuesday afternoon it's business as usual for D1
D2 announcement
No class next Tuesday for D2. We have the interscholastic meet that morning.
I need a couple of you to help me with the Design Competition.
I need a couple of you to help me with the Design Competition.
D1 Announcement
Please login to Bb and look at the calendar to see the new critique date.
you're welcome
you're welcome
Saturday, January 29, 2011
Influenza and Hand Sanitizer
The campus nurse sent out an email to everyone on campus Friday about a confirmed case of Type A Influenza. This is highly contagious. Please please please get into the habit of using the hand sanitizer in the lab as much as possible to reduce the spread of germs. There may be no place on campus that has a higher potential for germs spreading than a computer lab.
 There is also a viral condition that is widespread on campus right now. It mimics the symptoms of Influenza, but is not the flu. If you feel sick, go to the nurse asap.
Thursday, January 27, 2011
D2 Iconic Logo might be dead
NBC has been purchased by Comcast. Reportedly, the new owners will nix the iconic peacock logo that has been used for decades.
NEW LOGO


NEW LOGO
CURRENT LOGO
EARLY NBC LOGO
For once, use this posting to voice your opinion on this issue. What do you think about the proposed change. Do you want to earn an A in this class?
dig1tutorial1brenna
Motion blur filter can be used to show high velocity motion trail effect in your image.


lasso your image
apply the filter blur motion blur.

select the blur levels according to personal preference.

finished effect.

D2 Enclosure Logo Miller


Here are my Mist Soap logos. The first one is the main logo and all the ones are the different types of soaps. I kept the logo exactly the same except for the colors and I added a few objects to it to represent each one. I think that my favorite is the tropical sunrise one because of the colors. The micro clean one is my least because I was not sure what to do with it besides changing the colors. I tried to make the logo neutral so that it might attract both male and female consumers. I hope I succeeded.
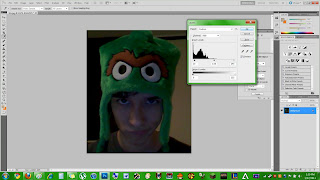
D1 Tutorial No. 1 Hale
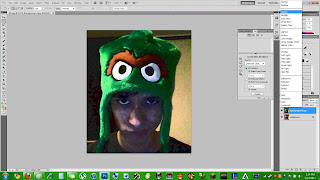
In this tutorial, I will be showing you how to make a picture look like it's in an old school comic book. A good choice of image is one of a person facing the camera, those usually come out looking the best. You should also make sure the image is between 10 and 20 in. tall in Image>Image Size.
1) step one is to adjust the levels to look more like they did in comics.
2) I recommend levels of at least 20, 1.0, and between 200 and 255, toy around until it looks good and contrasted.
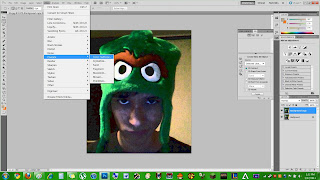
3) Now we are going to make the picture looks nice and grainy to combine with the final effect for a good old comic book look.
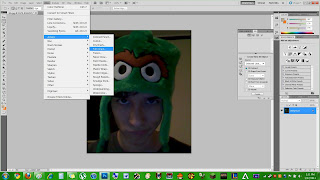
4) I recommend 4,0,6, but what you actually pick is once again, dependent on what would look best for your particular image.
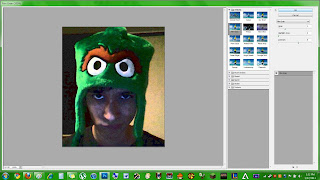
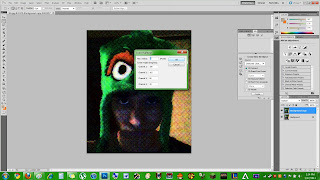
5) Now we need to duplicate our layer so that we can combine the two crucial effects.
6) Right click on the duplicated layer and select "Darken"
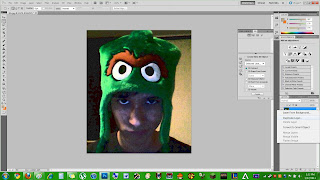
7) Now for the final effect, we are going to add the comic book pixel look
8) I recommend between 4 and 10 depending on the picture, make sure not to change the other values. If nothing in that range looks right, your image is probably too big or too small. That's it!
1) step one is to adjust the levels to look more like they did in comics.

2) I recommend levels of at least 20, 1.0, and between 200 and 255, toy around until it looks good and contrasted.

3) Now we are going to make the picture looks nice and grainy to combine with the final effect for a good old comic book look.

4) I recommend 4,0,6, but what you actually pick is once again, dependent on what would look best for your particular image.

5) Now we need to duplicate our layer so that we can combine the two crucial effects.

6) Right click on the duplicated layer and select "Darken"

7) Now for the final effect, we are going to add the comic book pixel look

8) I recommend between 4 and 10 depending on the picture, make sure not to change the other values. If nothing in that range looks right, your image is probably too big or too small. That's it!

D1 Tutorial #1 - Blake Stewart
Tutorial: Using Photoshop to create a radial blur effect around an image.
1) Choose the photo you to which you want to apply the blur effect. Using the Elliptical Marquee Tool from the Toolbox make an ellipse around the area of the image you wish to focus on. Holding space while using this tool will allow you to move the ellipse without further reshaping it.

2) In order to apply the effect only to the image outside of the selected ellipse. Go to Select > Inverse. This will select the rest of the image from the ellipse out to the border.


3) Next to keep the effect from looking too harsh we need to feather the edge of the ellipse. In order to do so choose Select > Modify > Feather. The number of pixels you feather will depend on the resolution of your image. In this case my image was about 640 x 420 pixels. A feather of 35 pixels worked for me.

4) Now we will apply the radial blur effect. To do so choose Filter > Blur > Radial Blur. You will need to change Blur Method to "Zoom", and the Quality to "Good". The Amount you choose will vary based on what you want from the effect. In this case I put 50 as the amount.

Here is the final product. Vroom...

Free photo editing software
GIMP http://download.cnet.com/GIMP/3000-2192_4-10073935.html?tag=mncol
You should be able to open and edit unflattened photoshop files with this software. Some students have had problems with it in the past though. Photoshop can open unflattened GIMP files too.
You should be able to open and edit unflattened photoshop files with this software. Some students have had problems with it in the past though. Photoshop can open unflattened GIMP files too.
D1 Tutorial #1 Sijan
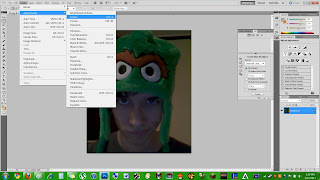
I have a tutorial on how to make digital image look like a painting using photoshop.


Step 1 > First you select the picture and open the picture in the photoshop.

Step 2 > Click on filter, then select Brush strokes and select Accented edges.

Step 3> Once you select the accented edges, you picture will appear on the screen that looks like a paint as shown below. Here on this page, you can make a selection on the type of strokes you would like to apply to your picture. Also on the right hand corner you have a tool where you can manage the edges, brightness and smoothness of the picture. Once you are satisfied with your selections and press Ok.

Step 4> Now you have a new picture that you changed which looks like a painting.

Step 5> Now to post both the pictures on the same page, you can select the pictures , copy and paste it into the new file simultaneously. After pasting the pictures into the new file you can use free transform to the pictures so you can arrange them accordingly.

Step 6>Do the same with the new picture which you changed to look like the painting. After you have rearranged both the pictures and posted them into the same page, you can have your result as follows.

Thank you. Hope my tutorial will help you. Have a nice day.
Subscribe to:
Posts (Atom)