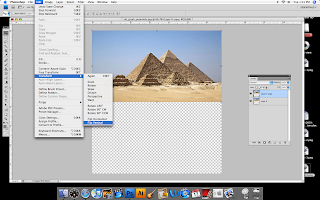
1) Open the image in Photoshop. Make sure you are working in RGB mode so that all filters will be available.
2)Double click on the layer in the layer menu on the right. This will open up another box. Click OK and it will make the background layer into a normal layer. It will then be labeled as Layer 0.

3)Select the rectangle marquee tool on the left side.

4) Select the section of the picture you would like to have reflected into the water. After making the selection, go to Image>Crop

5) Now that the picture and canvas are cut to size, go to Image>Canvas Size. This will open another window that will allow you to change the size of the overall canvas. Match your menu to the one I have here>>>
 **Set the anchor to the top, use percent and adjust the height to 100%. Make sure relative box is checked. This will make the canvas exactly doubled in height.
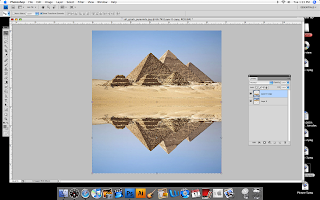
6) Duplicate layer 0 to make a layer 0 copy of the exact same photo. Now go to Edit>Transform>Flip Vertical.
7) Now move the flipped layer (layer 0 copy) down underneath the original layer (layer 0)
8) With layer 0 copy selected, go to Filters> Stylize> Wind. A window will pop up with options. Select Wind and From the Right. Click OK.
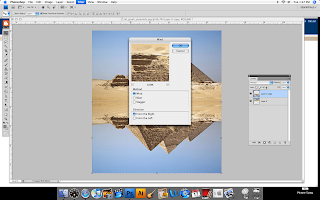

9) Repeat Step 8 with Wind from the left. You can use this effect as much as you feel needed to distort the edges.

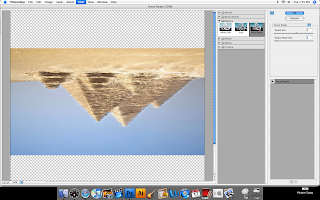
10) Go to Filter>Distort>Ocean Ripple. Change the setting to be Size=9 Magnitude=1. You can also repeat this as many times as you see fit.

11) Click Add a new layer at the bottom of the Layer window. Place the layer between the existing layers (layer 0 and layer 0 copy) This new layer will be layer 1.

12) With Layer 1 selected, hold down control and click on Layer 0 copy. On the pop-up menu click Select Pixels.
13)Now select a nice blue color by clicking on the top color box on the left tool menu. (foreground color)

14) With layer 1 selected in the layer window, hold the option key and press backspace. This will fill in layer 1 with the selected blue color on the bottom half.

15) Now, with layer 0 copy selected in the layer window, click Add Layer Mask.

16) Click the Gradient Tool on the left. **Make sure that the color boxes at the bottom are showing white over black.**

17) Click on about the middle of the canvas (around where the two pictures meet) and drag it well off of the bottom of the canvas.

**This creates the effect that the reflection is disappearing into the water. You may have to change the color of the blue and/or the placement of your gradient in order to make it look the way you want.

3 comments:
Great job! It looks like you put a lot of thought into this tutorial!
That's awesome, have you had any experience working with photoshop before taking this class?
I have had a little but I learned this recently when I was having to do artwork for a project in another class.
Post a Comment