How to make lightning
Step 1: Open a New document.
Step 2: Right click background layer and select "layer from background".

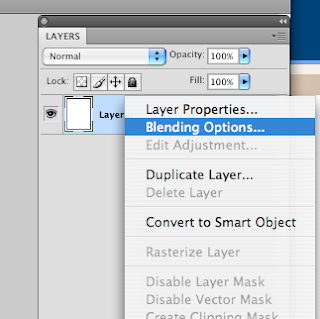
Step 3: Now right click the layer again and select blending options.
Step 4: Go to gradient overlay. Change the angle to about -10, make sure the style is linear and make sure the preset is black to white. These should already be set this way but they may not. You can also right click the gradient preset and adjust how much black, gray, and white is there but, you don't have to do this.

Step 5: Now flatten your image then go to filter > render > difference clouds.

Step 6: Now go to image > adjustments > levels, and set your levels to match the picture.

Step 7: Now go to image > adjustments > invert.

Your image should look like this

Step 8: Now create a new layer and color it with a blue gradient. Make sure you change your colors to blue and simply use the gradient tool, you don't have to do the same process as before.


Step 9: Set the blending mode to overlay.


Step 10: Now use a soft brush and paint some of the top with a red or violet color.

Thats it, your done!
4 comments:
another really good tutorial!
thanks, looking at this now, the red at the top could look better than it does...
Yeah, I like step 9 better than the finished product.
finished product loooks nice
Post a Comment